Become a FAN of VRSEC SOURCES BECOME A FAN<<>> updates:autobiography; novels<<>>subscibe to Asist_sources mobile alerts & get daily updates of this blog to ur mobile along with motivational quotes ,funny sms , frienship sms and many more.

Search The Blog

HashMap Explaination

1


How HashMap works in Java? With Animation!! whats new in java8 tutorial
How does java hashmap work ? HashMap is one of the most popular java.util data structures. Its one of the associative array implementations, here I have explained its internals in simple terms using an animation. Java8 adds a bit of enhancement to HashMap by using a balanced tree when there is too much has collisions.

Best Commands to find the information about the LInux OS running

5

uname 
uname -a
uname -v
uname --help
cat /etc/issue.net
cat /etc/redhat-release
lsb_release -a   ==> I prefer this command 

Unable to open kernel device "\\.\Global\vmx86": The system cannot find the file

0
Unable to open kernel device
"
.\Global\vmx86": The system cannot find the file specified. Did you reboot
after installing VMware Workstation?
Failed to initialize


Solution for this type error which occurred when opening an vmplayer. 


try to re-install the vmx86 driver

open a cmd in adminmode and navigate to the VMware installation directory and run

 vnetlib -- uninstall vmx86 
reboot
check again with the net start command - this time it should say "service name  is invalid"
then run
 vnetlib -- install vmx86 
and reboot again

now it hopefully works


Second simple solutions is 

start CMD as administrator then run  "net start vmx86".


Start a spark master worker nodes spark-shell in Windows 10

0

open cmd 
goto the installed folder of spark


C:\Spark>bin\spark-class.cmd org.apache.spark.deploy.master.Master

C:\Spark\bin>spark-class org.apache.spark.deploy.worker.Worker spark://192.168.5
6.1:7077


Now Another command prompt type : 

spark-shell --master spark://192.168.56.1:7077


Now the screen shot is


Now you can see the Application ID . Click on the Id and explore yourself.

Be sure top have SPARK_HOME is set in environmental variables ..


Note:
we have to open different cmd's to execute commands
cntrl+c on command line to terminate the process

HotSpot or JRockit to find which JVM is running from JAVA

0
f you want to know whether the currently running JVM is HotSpot or JRockit, check System.getProperty("java.vm.name"). For me, it gives Java HotSpot(TM) 64-Bit Server VM on HotSpot and Oracle JRockit(R) on JRockit, although different versions/platforms may give slightly different results, so the most reliable method may be:
String jvmName = System.getProperty("java.vm.name");
boolean isHotSpot = jvmName.toUpperCase().indexOf("HOTSPOT") != -1;
boolean isJRockit = jvmName.toUpperCase().indexOf("JROCKIT") != -1;
Thorbjørn's suggestion to use java.vendor has the problem that the same vendor may produce multiple JVMs; indeed, since Oracle's acquisitions of BEA and Sun, both HotSpot and JRockit now report the same value: Oracle Corporation
If you want to find all JVMs installed on a system: the problem with Nambari's answer, to use the command java -version, is that the JVM can be installed on a machine yet not be present in the path. For Windows, scanning the registry could be a better approach.


Spark Windows Installation ERRORS : WINUTILS.EXE , RuntimeException

0
Spark Installation in Windows caused two errors to start successfully without any errors. 

1. Missing binary file WINUTILS.EXE

  Solution :  Download the latest WINUTILS.EXE and place that in %HADOOP_HOME%\bin\winutils.exe 

Note: winutils.exe  should be more carefull in downloading the LATEST one


 prechecks before downloading :
  1. check whether windows is 32 or 64 bit 
  2.checking the winutils downloadable is 32 or 64 bit compatable 

Because 32 bit will work for 32 bit and 64 bit will work for 64 bit only 


2. ava.lang.RuntimeException: java.lang.RuntimeException: The root scratch dir: /t
mp/hive on HDFS should be writable. Current permissions are: rw-rw-rw-


After donwloading and importing the winutils.exe in bin folder .

create /tmp/hive  folder in C:\  using command line in admin mode 

and run the below commands 

%HADOOP_HOME%\BIN\WINUTILS.EXE chmod -R 777 \tmp\hive  
%HADOOP_HOME%\BIN\WINUTILS.EXE ls \tmp\hive 

At last you must contain C:\tmp\hive with full access to every user


in my case 

SPARK_HOME = C:\Spark\bin
HADOOP_HOME=C:\Spark


Thanks for reading

Gradient Descent, Linear Regression and running the algorithm using python

0


https://spin.atomicobject.com/2014/06/24/gradient-descent-linear-regression/

Go to this link it helps you to understand the overview  gradient descent .

Code for this example can be found here


 from numpy import *  
 # y = mx + b  
 # m is slope, b is y-intercept  
 def compute_error_for_line_given_points(b, m, points):  
   totalError = 0  
   for i in range(0, len(points)):  
     x = points[i, 0]  
     y = points[i, 1]  
     totalError += (y - (m * x + b)) ** 2  
   return totalError / float(len(points))  
 def step_gradient(b_current, m_current, points, learningRate):  
   b_gradient = 0  
   m_gradient = 0  
   N = float(len(points))  
   for i in range(0, len(points)):  
     x = points[i, 0]  
     y = points[i, 1]  
     b_gradient += -(2/N) * (y - ((m_current * x) + b_current))  
     m_gradient += -(2/N) * x * (y - ((m_current * x) + b_current))  
   new_b = b_current - (learningRate * b_gradient)  
   new_m = m_current - (learningRate * m_gradient)  
   return [new_b, new_m]  
 def gradient_descent_runner(points, starting_b, starting_m, learning_rate, num_iterations):  
   b = starting_b  
   m = starting_m  
   for i in range(num_iterations):  
     b, m = step_gradient(b, m, array(points), learning_rate)  
   return [b, m]  
 def run():  
   points = genfromtxt("data.csv", delimiter=",")  
   learning_rate = 0.0001  
   initial_b = 0 # initial y-intercept guess  
   initial_m = 0 # initial slope guess  
   num_iterations = 1000000  
   print "Starting gradient descent at b = {0}, m = {1}, error = {2}".format(initial_b, initial_m, compute_error_for_line_given_points(initial_b, initial_m, points))  
   print "Running..."  
   [b, m] = gradient_descent_runner(points, initial_b, initial_m, learning_rate, num_iterations)  
   print "After {0} iterations b = {1}, m = {2}, error = {3}".format(num_iterations, b, m, compute_error_for_line_given_points(b, m, points))  
 if __name__ == '__main__':  
   run()  


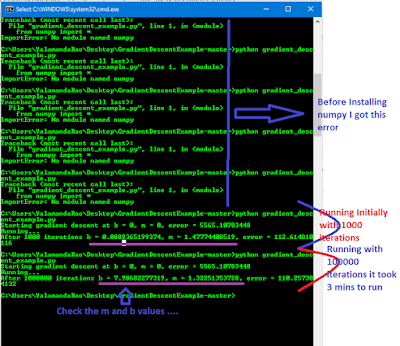
For Running this program you need Python and numpy should be installed.

Install Python : Download (Install Python and set classpath/path)
Install Numpy : Download  (Ater installing python follow the below steps to install Numpy.)

1:  go to this website to download correct package: http://sourceforge.net/projects/numpy/files/  
2:  unzip the package  
3:  go to the unzipped folder   
4:  open CMD here (path of the unzipped foolder)  
5:  then use this command to install numpy: " python setup.py install "  

Note: Installing numpy will take more time like 10mins be patient.

After completing all the above steps , the only left is download the complete program , data.csv file from Github, then go to the download folder in cmd prompt and give command as
1:  python gradient_descent_example.py  

Please check the screen shots .

Gradient Descent, Linear Regression and running the algorithm using python

Installing Numpy
Installing Numpy


Create a project in Eclipse

0
Download Eclipse Luna Here (Select Here Windows 32 Bit or 64 Bit based on your requirement) 
  - If the downloaded file is a zip file extract it C:\ folder  or to your desktop . Open the extracted folder click on eclipse.exe file . Thats it. Now you are all set. 


Create a project : 

 This steps will show you how to create a Java application project in Eclipse.
  1. Choose File → New → Java Project from the Eclipse menu bar
  2. Enter the Project name as  "com.[company or Institute name].[Module or project name] " , then click next and next 
  3. Finish
Now you are able to see the project on the left side of the IDE , tree down the project  you are able to see the src folder and JRE system library folder . 

In the src folder create  15 folders (right click on the src folder New-> folder) name them from Lab1_[Date] to Lab15_[Date]


Disclaimer

This is a cool blog where we can find many of our stuff.Like me who want to contribute to this blog sign in with google account appearing on the left side(below subscribe blog).Then u can post any stuff to help our frnds.
thank u frnds.


To help u how to roam on this site ?how to check ur topics?
see the menu and u will find links which appeared in blue and click on the option u need(appeared below cheeky quotes).
or
see the blog archieve (below the search blog).